Crafts & DIY · Tutorial

No Sew Fabric Flowers, two ways: A Tutorial

Hiya Folks!

I’m back with part two of the Handmade flower tutorial that I talked about on Local 5 Live yesterday morning… Seriously, did that really happen? I’m so glad to have video proof!

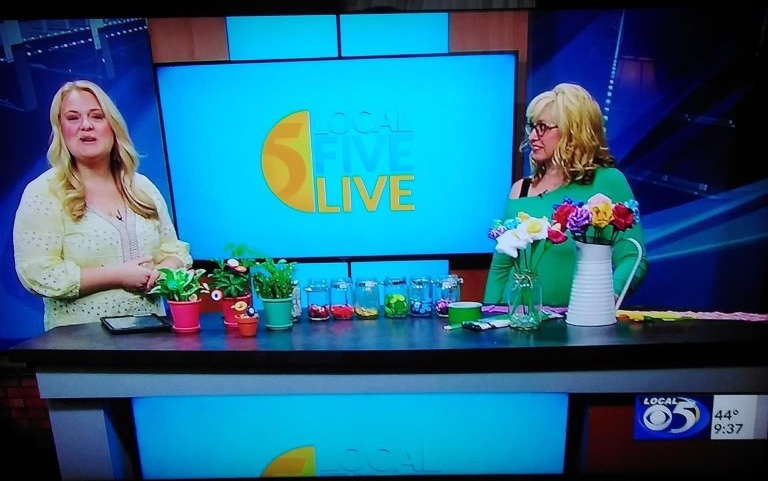
I’m still getting over the craziness of it all! Pic above….but here’s the video if you missed it.

So let’s Talk fabric flowers! Both types of these flowers are made the same way… But I will walk you through them step-by-step! I promise anyone can do this!

Let’s start with the One Colored Rose Type, shall we?

Supplies Needed:

Duct Tape

Wooden Dowels

Fabric strips

I spray painted my dowels ahead of time… This is a quick and easy way to do it. However, you are more than welcome to leave them plain… Paint them by hand… Or even cover them with other colorful tapes

Next we are going to start creating the rose.

For your fabric strip you can experiment with different lengths and widths… The width I would say use between 3-5” ….for length, the longer the strip is, the FULLER your rose will be. I like about 25-30”.

Below I am showing how to fold the fabric: fold over the end about 1/2 inch and then hot dog fold it in half.

Before you go any Further you want your tape ready. Now, you can buy smaller duct tape… But the large duct tape will work just as easily if you cut it in half. Make pieces about 1 1/2”-2” long and your last piece should be about 3”.

Insert the dowel and tape to secure.

To create the flower, you’ll pleat the Fabric three times, and then secure with tape. Rotate the dowel, and repeat this process until you reach one inch away from the end of your strip of fabric.

Here you’ll want to fold the end in so it looks clean, and the end won’t fray.

Almost there!!!! Now take your last longer piece of tape and finish it off by wrapping it tightly around the dowel.

YOU DID IT!

If you’re more of a “moving picture” kind of crafter….I attempted a video of this process below 🌸 🎥

Practice! practice! PRACTICE! Soon you’ll have a vase full!

Now, once you’ve mastered that idea….you can make this second daisy-like flower in the same manner…..the only difference is you’ll have two colored fabrics, and wrap them either tighter or looser.

The center will look best cut about 2- 2 1/2” wide and 10”-12” long. You’ll do exactly as above for the first 3 pleats, but then you’ll just wrap the remainder tight in the circle and secure with tape. It will look like a BUD.

The second fabric should be 3- 3 1/2” in width and 15”-18” in length….and you’ll perform the same pleating/taping as above with the rose…..juuusst a little looser.

And there you HAVE IT!

TWO FLOWERS, one method!

Please share pics of you make some of your own!

AND HAPPY MOTHER’S DAY!!!

Crafts & DIY · Tutorial

Fabric Cross Decor Tutorial

This past weekend as I was changing out St. Patty’s Day decor with Easter….I realized I needed a new art piece to hang above our mantle.

Thing was, purchasing one wasn’t in the budget….so I went on a treasure hunt in the house.

I found some old frames: one for me & one for Georgia.

We each picked out the fabric we wanted and cut strips out leaving just a few inches on each side of the open frames.

Next up: STAPLE GUN!

I tried getting Georgia to use it, but it packs too much of a punch for her (little scary 😧 to me too, to be honest…you could totally hot glue too) Since we had one, I stapled the strips to the back of the frame to hold in place.

Now to make the cross….flip the frame over and use wire to tie at the place the fabric intersects. Don’t have wire? Got any old bread twist-ties? Those will work too! Or, I suppose string would work as well….wire just makes the next step easier.

And the finishing touch: COMPLETELY up to you! Use some Ribbon and tie a bow, use the wire to add a flower, glue a BIG BUTTON…or like we did: add a broach or pin.

Ours are a little extra special to us because they were our Grandmas’

The Pearl one from my Grandma Flo…

And Georgia’s pin was her grandma’s (my mom’s)

I’m super happy how these turned out. Plus they put an added smile on my heart when I see a part of my family in them.

My Hallmark Obsession · Sewing

Week 11 Sewing Challenge: Act of Craftivism

This week’s prompt “Act of Craftivism” was something I had to look up. Depending on who you ask or where you look…the definition of CRAFTIVISM varies.

The simplest one I found is this: using hand-made art to express opinions or to support a movement, a combination of craft and activism.

As an added bonus this week, three of our kiddos were on spring break…so I wanted involve them in this challenge.

It was only a year ago that our children came home from school for Spring Break….and they remained home for the rest of the year. I know, join the club, right? What it does mean, though, is: the majority of the country (and the world) started to relate to the struggles of each other.

This past year was hard. It’s been a lesson in patience……in perspective…..in compassion….in resilience…. These things are what our family tried to focus on.

However, these are not new concepts for our family. In fact, since our oldest daughter was born we’ve been learning this daily.

Our other 3 younger children have grown up in a house where they’ve known nothing else. We include everyone. We love everyone. We acknowledge differences, yet embrace and celebrate them.

As they all grow older, it becomes more obvious. The gap is more pronounced. It also is very apparent that they all have hearts full of love and understanding.

So, the “cause” we chose to act for in this week’s challenge:

Inclusion. Love. Anti-Bullying. Encouragement.

“Be Kind“

We planned out what we wanted to say…..

Chose our fabric and cut out pennants to make our banners.

“You are Cool“

A couple of the kids even got behind the sewing machine

(Bonus: you can totally do this with HOT GLUE if you’re not a sewist)

“U R L❤️VED“

Then, we went out around our city and hung our messages.

Smile

We Pray our Small Acts touch some Hearts in a BIG way!

“Be the GOOD“

P.S. Last night we sat down for a Family Movie Night and watched one of the Hallmark Movies that have been recommended to us for awhile now….

What a powerful message!

Many questions and conversation starters for you and your family if you are looking for a way to talk about friends with Special Needs. Our kids loved it! (even if some parts were really hard to watch…)

We’d love to hear of you’ve seen one of our banners!

Or even better….if you make some of your own!

Sewing

Week 5 Sewing Challenge: Sew Something for Storage

When this week began, I had big plans for sewing some fabric boxes or containers for my sewing studio….organization still on the mind…..and I gotta harness that while the mood strikes, ya know?

But, as I was sitting at my machines sewing garments….this Big Jar ‘O Zippers was staring me right in the face. I realized that I purchased these zippers months ago with plans to make more Stuffed Animal Storage Bean Bags…..but I never did. What made me wait so long? Not sure. I made this one for the girls’ room last spring.

And this guy for the boys’ room:

Then made this one for auction shortly after…

I even had a friend order one for her daughter’s birthday:

They seemed popular enough, so perhaps it was just the colors of zippers I had left that was holding me back.

That’s when I find it’s nice to come at it from a different perspective. I went Zipper to Fabric….instead of Fabric to Zipper. Meaning, I used the color of the zippers I had to inspire the fabric choices in these…… and that, my friends, is your weekly glimpse into the crazy train in my brain that led me to the decision to make these this week:

If you’re interested to have one to be your very own, you can bid on them this weekend in the Red Rose Auction House. (Hint: click on those blue words to find the Auction items up for bids)

Our littlest guy loves his so much he fills it half full and sleeps on it like a pillow 🙂

Week 5 of 52 in the books!

Sewing

A is for Aylah: CKC Sew the Alphabet

Remember when I said I don’t do resolutions?

Well, this is where I find myself at the beginning of a new year… Signing up for yet another challenge.

I attempted this one last year with CKC’s ABC character sew-a-long. and you saw I made it all the way to letter C! Super impressive, no?

Well, since I did so well last year in following through with my Hexie temperature quilt… I am going to try another challenge as well.

One of my favorite pattern companies is having an alphabet sew-a-long … They have a schedule where every two weeks a letter is posted & participants sew a pattern that begins with that letter.

My personal goal is to sew one of their patterns that I own, but have not sewn up yet. Yes, that means I have probably every letter of the alphabet in patterns of things I have yet to try and sew. Don’t judge me.

For A I chose Aylah’s Knit Twirly Skirt because it is an awesome stash buster for me, and after last weeks 52 weeks sewing challenge, I found a lot of scraps I need to bust.

I had some help with this: I asked Georgia if she wanted to help me make her a new skirt… This girl. If you are a personal friend of ours or you have followed LadyBeez business, our children have been modeling for me their whole lives…

This one, however, certainly has the posing thing down. On top of that she is quite the little designer. So apart from me actually sewing this together, she picked out and arranged all the fabrics.

Oh this mama’s heart. It’s so bittersweet watching your little girl grew up before your eyes. I wish I could freeze time……